How to Put Your Motorcycle to Sleep for the Winter
A Complete Guide for Beginner Riders
Every spring, the same story repeats itself in repair shops. Someone rolls in a bike that "just sat all winter," and now it won't start, limps on both wheels, and looks like it was painted in a barn. It's not the motorcycle's fault: a machine left unprepared will create plenty of problems for itself over the winter. Dampness, stale fuel, cold, and inactivity all take their toll.
The good news: winterizing doesn't require taking the bike apart or having specialized skills. You just need one free evening, basic supplies, and a little patience. Let's go step by step.
1. Washing and Drying: The Foundation of Storage Prep
Many people think washing a motorcycle before winter is just for looks. In reality, it's the most technical part of the prep. Dirt on the frame, in joints, and under fairings acts like a sponge: it absorbs moisture and road salts and holds them against the metal all winter long. By spring, anywhere you missed will show whitish spots of corrosion, bubbling paint, and oxidized fasteners.
Many people think washing a motorcycle before winter is just for looks. In reality, it's the most technical part of the prep. Dirt on the frame, in joints, and under fairings acts like a sponge: it absorbs moisture and road salts and holds them against the metal all winter long. By spring, anywhere you missed will show whitish spots of corrosion, bubbling paint, and oxidized fasteners.
How to wash. Regular car shampoo or dedicated motorcycle cleaner will do. Wash from top to bottom, use plenty of water, but avoid spraying high-pressure jets directly at wheel and steering head bearings, wiring connectors, the instrument cluster, or the exhaust. High pressure forces water into places it can't easily drain from. A soft brush for the wheels and chain will also come in handy.
How to dry. This is just as important as washing. Wipe the bike completely dry, and use a hairdryer or compressed air to blow out crevices, under the tank, and around the headlight and gauges. Inexpensive handheld air blowers work great for this. The motorcycle must be 100% dry before you cover it—otherwise, you're just trapping moisture inside.
Protection. Once dry, you can apply polish to plastics and paint, and protect bare metal parts (uncoated frame sections, bolts, suspension components) with silicone spray or a corrosion inhibitor. Just keep everything away from the brake rotors, pads, and tires—polish and lube will ruin your stopping power.
2. The Chain: The Trickiest Part to Winterize
The chain is arguably winter's biggest victim. It's exposed to the elements, and if left dirty and dry, it can seize up and develop surface rust by spring. Replacing a chain and sprockets isn't cheap.
The chain is arguably winter's biggest victim. It's exposed to the elements, and if left dirty and dry, it can seize up and develop surface rust by spring. Replacing a chain and sprockets isn't cheap.
Clean it first. Grab a dedicated chain cleaner (or kerosene, though use caution: harsh chemicals can damage seals on O-ring/X-ring chains). Scrub off old grease and grime with a brush, wipe it down with a clean rag, and let it dry.
Then lubricate. It's best to lube the chain while it's slightly warm after a short ride so the lubricant penetrates better between the links. Spray it onto the inside of the chain along the rollers, and wipe off any excess so it doesn't fling onto your wheel. Make sure the lube is compatible with your chain type (sealed O-/X-ring or non-sealed).
If your bike is shaft-driven, you can skip this step—though it's worth checking your manual, as final drive oil levels still need periodic inspection.
While you're at it, lubricate the clutch and throttle cables, lever pivots, footpegs, and kickstand. A couple of drops per pivot point is plenty; wipe away the excess. Anyone who has ever tried to pry open a seized clutch lever in spring knows why this matters.
3. Oil, Filter, and Other Fluids
Old engine oil is dangerous because over a riding season it accumulates acids, carbon deposits, moisture, and unburned fuel. Left sitting in the engine all winter, it will slowly eat away at internal metal parts. That's why it's best to change the oil and filter before winter storage, not in the spring.
Old engine oil is dangerous because over a riding season it accumulates acids, carbon deposits, moisture, and unburned fuel. Left sitting in the engine all winter, it will slowly eat away at internal metal parts. That's why it's best to change the oil and filter before winter storage, not in the spring.
Here's the process. Warm up the engine for a few minutes (warm oil drains more thoroughly and carries more contaminants out with it), drain the oil, replace the filter, and refill with fresh oil to the proper level. Check your owner's manual for the exact type and viscosity. You won't need to change it again in spring as long as the bike wasn't run over the winter.
Coolant. If your bike is liquid-cooled, check the antifreeze. It needs to handle your local winter lows: if temperatures drop to -20°C (-4°F) or below, a weak mix can freeze and crack the radiator or engine block. You can check it with an inexpensive hydrometer/coolant tester. Usually, a 50/50 mix of antifreeze and distilled water is used, though exact ratios are listed on the bottle.
Brake fluid. Brake fluid absorbs moisture from the air and should be replaced every couple of years. If it's due, the winter off-season is the ideal time to do it.
4. Fuel: Where Most Mistakes Happen
Gasoline doesn't last forever. Over a few months, it oxidizes, degrades, and allows condensation to form inside the tank. Come spring, instead of gas, your fuel system is full of murky varnish that clogs injectors, carburetors, and filters.
Gasoline doesn't last forever. Over a few months, it oxidizes, degrades, and allows condensation to form inside the tank. Come spring, instead of gas, your fuel system is full of murky varnish that clogs injectors, carburetors, and filters.
The standard best practice is:
- Fill the tank nearly to the top to leave as little air space as possible (less air means less condensation and less tank rust);
- Add fuel stabilizer in the proper dosage (check the bottle instructions);
- Ride the bike or let the engine run for a few minutes so the treated fuel circulates through the entire fuel system.
One caveat. Some sources recommend leaving the tank half-full or draining the carburetor. On carbureted bikes, draining makes sense—especially if you skip fuel stabilizer, you should drain the float bowls using the drain screws. Much depends on your specific model, so check your manual or ask a trusted mechanic. There's no single universal rule, but "stabilizer plus a nearly full tank" works best in most cases.
5. The Battery: So You're Not Push-Starting in Spring
Batteries suffer the most in winter. A discharged lead-acid battery can freeze in cold weather, warping its internal plates and killing it permanently. On top of that, even a switched-off bike slowly drains power through alarms, clocks, and onboard electronics.
Batteries suffer the most in winter. A discharged lead-acid battery can freeze in cold weather, warping its internal plates and killing it permanently. On top of that, even a switched-off bike slowly drains power through alarms, clocks, and onboard electronics.
What to do. Remove the battery: disconnect the negative terminal first, then the positive. Wipe the case clean, charge it fully, and store it in a dry, cool place above freezing—ideally indoors or in a heated garage. Keep it off bare concrete floors; put it on a shelf instead.
If you have a smart trickle charger (battery tender), even better. Hook it up every month or two, or simply leave it connected all winter. When reinstalling in spring, reverse the order: positive first, then negative. Check the casing for any swelling or leaks beforehand.
If you have a lithium battery, make sure you use a charger specifically designed for lithium—a standard charger can ruin it.
6. Tires and Suspension: Let the Wheels Rest
When a motorcycle sits on two contact patches for months, the rubber deforms and flat spots develop in the tire cords. When you ride in spring, you'll feel a vibration that doesn't always smooth out. Your suspension also gets fatigued from bearing weight continuously all winter.
When a motorcycle sits on two contact patches for months, the rubber deforms and flat spots develop in the tire cords. When you ride in spring, you'll feel a vibration that doesn't always smooth out. Your suspension also gets fatigued from bearing weight continuously all winter.
The ideal setup. Put the bike on paddock stands so both tires are off the ground. If your bike has a center stand, that usually lifts the rear wheel, and you can use a front stand for the front. Be careful and make sure the bike is completely stable and won't tip over.
If you don't have stands. Overinflate the tires slightly above normal operating pressure (by 0.2–0.3 bar / 3–4 psi) and place wooden boards or thick cardboard under them to insulate the rubber from cold concrete. Once a month, roll the bike forward or backward a few inches so the weight rests on a different part of the tire. Don't forget to reset tire pressures in spring.
7. Storage Space and Cover
Location. A dry, ventilated garage is ideal. The key is keeping the temperature relatively stable—sharp temperature swings cause condensation, which leads to rust. Damp basements and outdoor tarps are the worst options.
Location. A dry, ventilated garage is ideal. The key is keeping the temperature relatively stable—sharp temperature swings cause condensation, which leads to rust. Damp basements and outdoor tarps are the worst options.
Plugs. Seal off the exhaust pipe and air intake to keep out moisture, dust, and mice (which love nesting in air filters). Dedicated exhaust plugs or plastic bags secured with rubber bands work well. Just make sure you don't forget to remove them in spring—a great trick is hanging a bright tag on the handlebars that reads "Remove Plugs!"
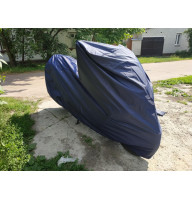
Cover. Your cover must be breathable—letting moisture vapor escape while keeping dust and water out. Plastic sheeting and heavy non-breathable tarps are a bad idea: condensation gets trapped underneath, undoing all your careful washing and drying. Invest in a fabric cover sized for your bike.
We have just such a cover in our store—made in Ukraine and tested by a great many local riders. It doesn't have the flashiness of overhyped brands, yet it fully delivers on its value compared to other alternatives.
We have just such a cover in our store—made in Ukraine and tested by a great many local riders. It doesn't have the flashiness of overhyped brands, yet it fully delivers on its value compared to other alternatives.
Security. If your garage doesn't lock securely, consider an anti-theft disc lock or heavy chain. People tend to forget to check on their bikes during winter, and thieves know it.
What NOT to Do
- Don't start the engine "for five minutes" in the middle of winter. It won't get up to full operating temperature, which just creates condensation in the exhaust and crankcase.
- Don't leave the bike dirty "for later."
- Don't seal the motorcycle up tight under plastic sheeting.
- Don't neglect the fuel and battery—these are the two most expensive mistakes.
Spring: Waking Up
Before your first ride, check tire pressures, oil and fluid levels, chain tension and lubrication, brakes, and lights. Remove the plugs and cover, and reinstall your charged battery. Start the engine and let it warm up properly. Keep your first ride easy and unhurried while the tires and brakes "wake up."
Before your first ride, check tire pressures, oil and fluid levels, chain tension and lubrication, brakes, and lights. Remove the plugs and cover, and reinstall your charged battery. Start the engine and let it warm up properly. Keep your first ride easy and unhurried while the tires and brakes "wake up."
Quick Checklist
- Wash and thoroughly dry
- Clean and lubricate chain, cables, and levers
- Change oil and filter; check antifreeze
- Fill tank, add fuel stabilizer, and run through the system
- Remove, charge, and store the battery indoors
- Unload the wheels and slightly overinflate tires
- Plug the exhaust and air intake, then cover with a breathable cover
Specific details (especially regarding the fuel system) depend on your motorcycle's make and model, so always double-check your owner's manual.